
Microsoft PowerToys is a diverse set of utilities you can use to customize Windows behavior. The collection currently consists of 24 tools, with ongoing additions.
Given the sheer range of the tools, some of them may be more useful to you than others. As such, I would like to highlight the PowerToys that I find most valuable.
- Always on Top
- Color Picker
- Command Not Found
- Crop and Lock
- File Explore Add-Ons
- File Locksmith
- Hosts File Editor
- Mouse Utilities
- Registry Preview
Always on Top
The first PowerToy is Always on Top. As the name suggests, Always on Top allows you to keep a specified window in the foreground, regardless of how many other windows you have open. In Figure 1, you will notice a thick blue border around the Calculator app. The border indicates that the Calculator app will stay on top of all other windows until you close the app.
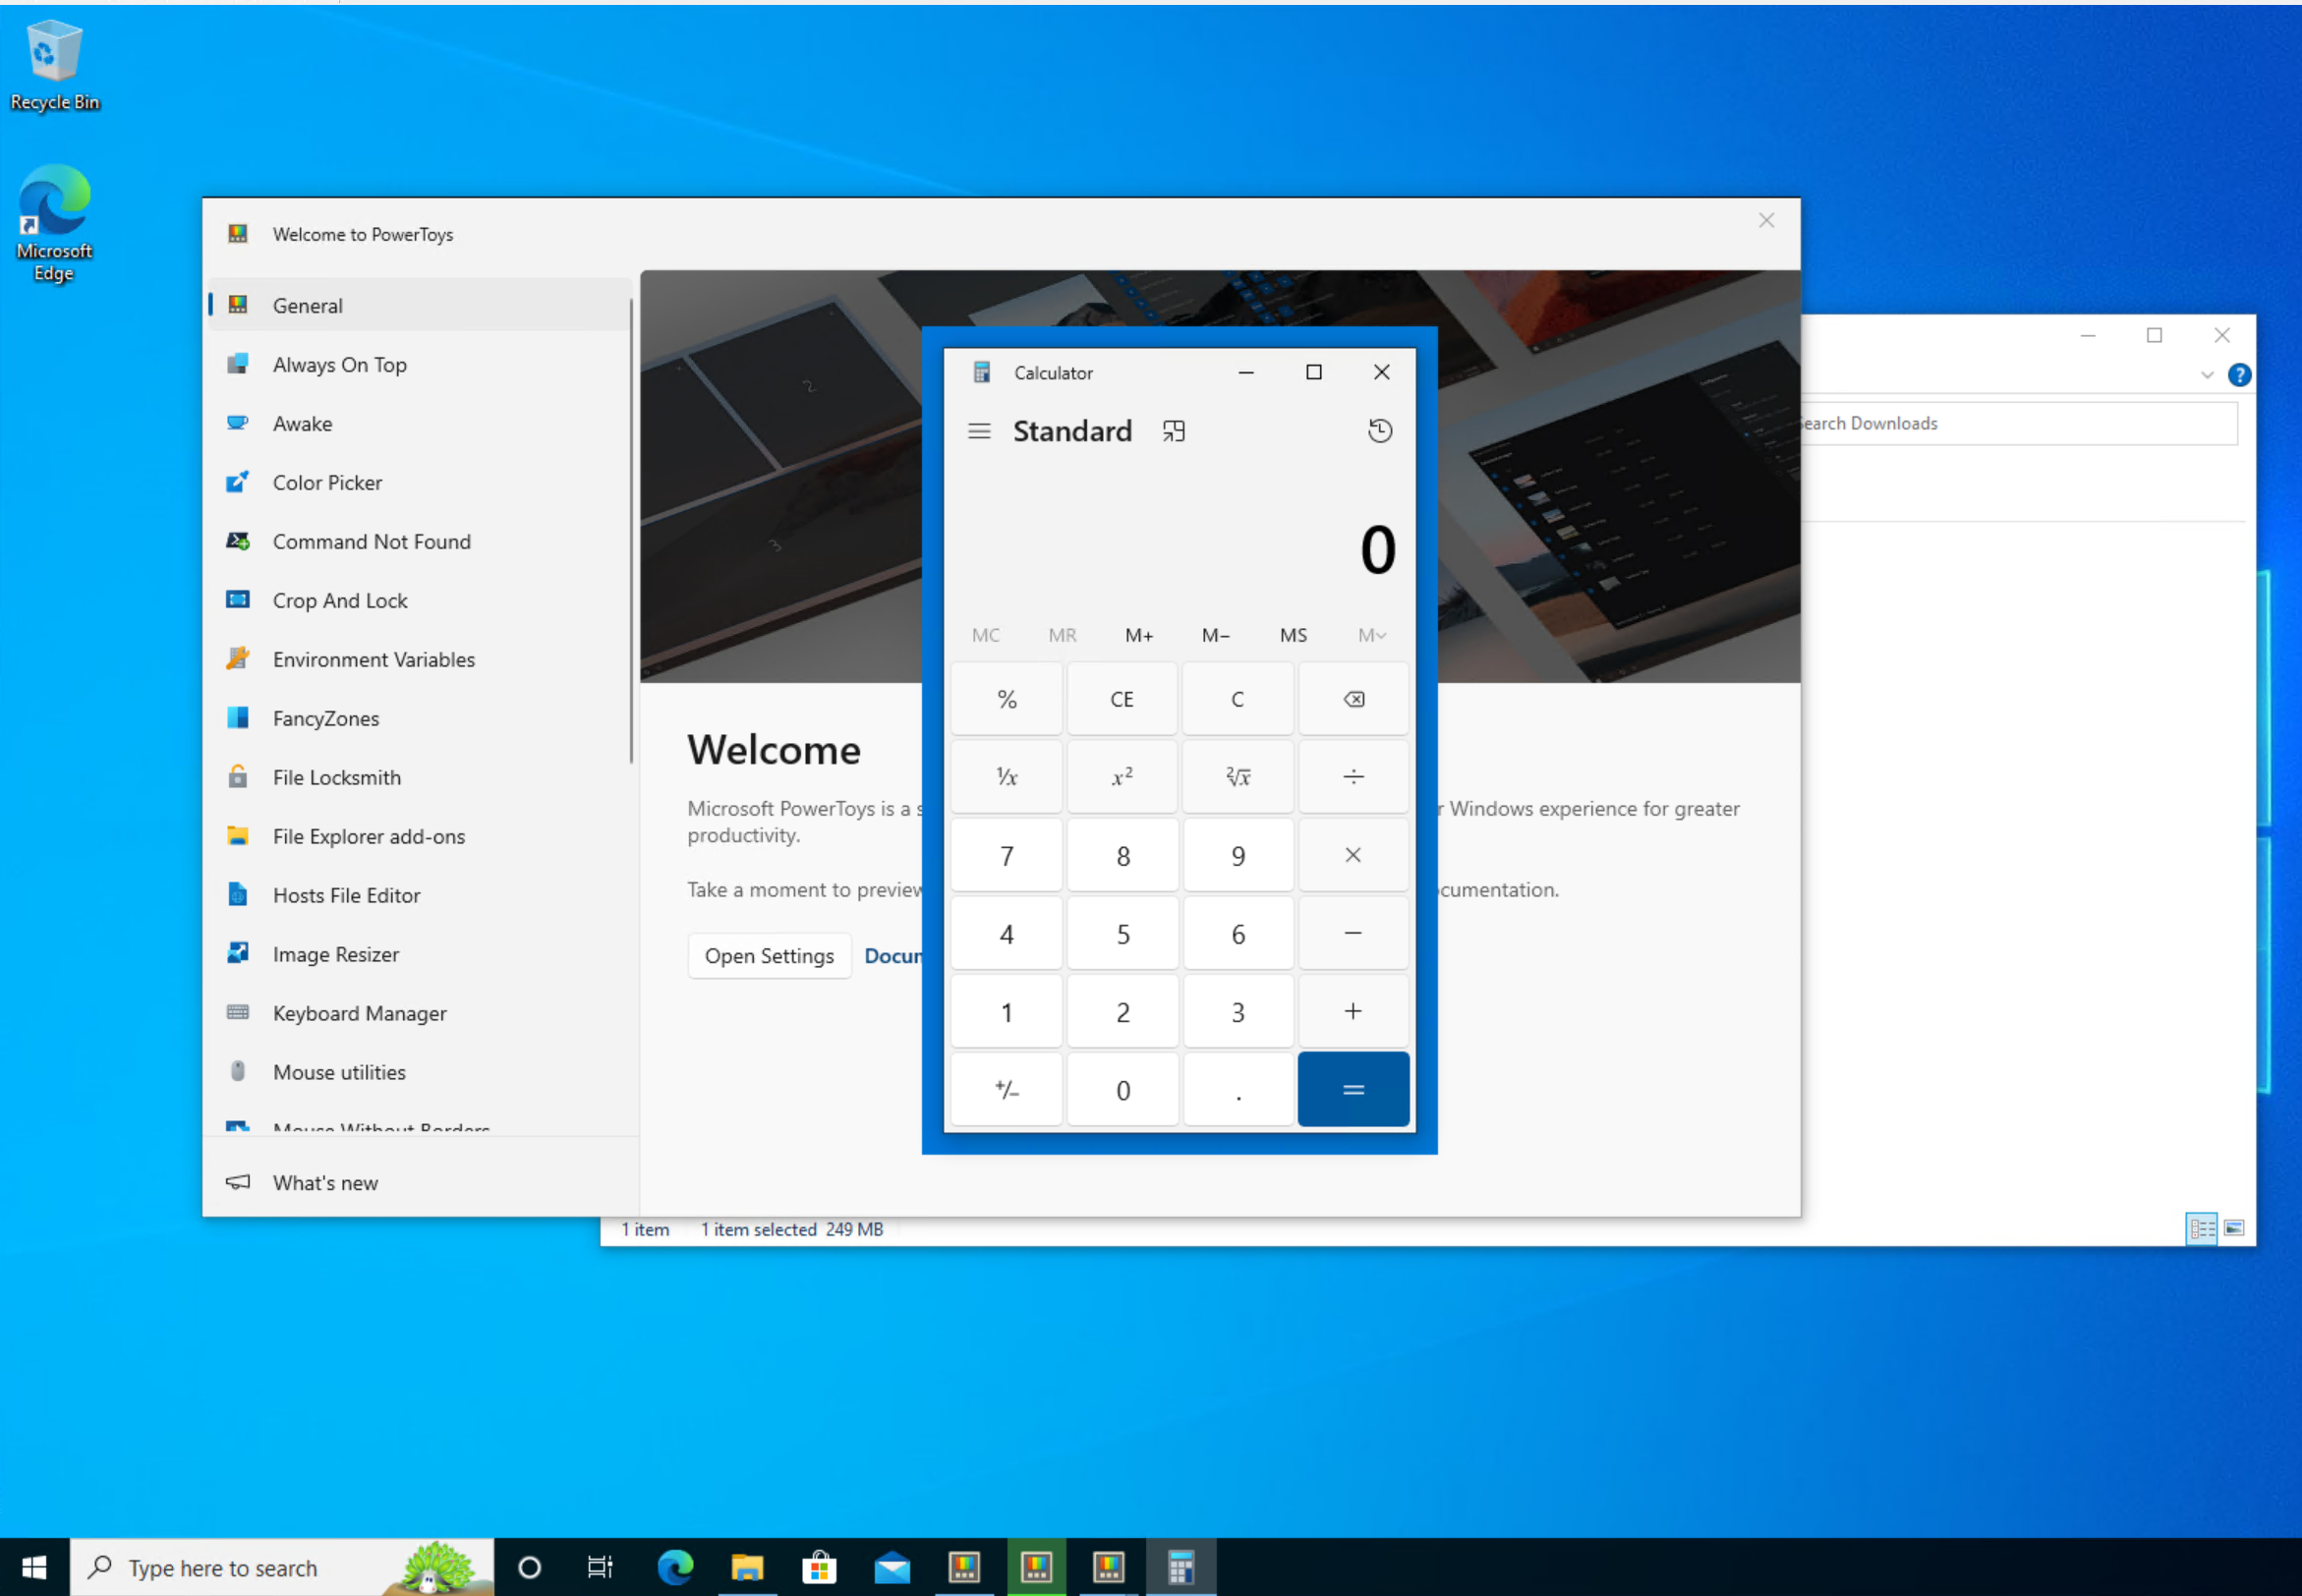
A colorful border appears around the Always on Top window.
I find the Always on Top tool to be immensely helpful. Even with four monitors connected to my primary PC, it seems like I never have enough desktop real estate, and I am constantly losing track of open windows. Always on Top makes it easy to prevent an important window from getting lost in the clutter.
To use Always on Top, just select the window you want to keep on top and then press the Windows key with Ctrl and T.
Color Picker
Color Picker is a tool that may not appeal to everyone but has become a personal favorite. When activated, Color Picker tells you the RGB, HEX, or HSL code for the color of the pixel under your mouse pointer, as illustrated in Figure 2.
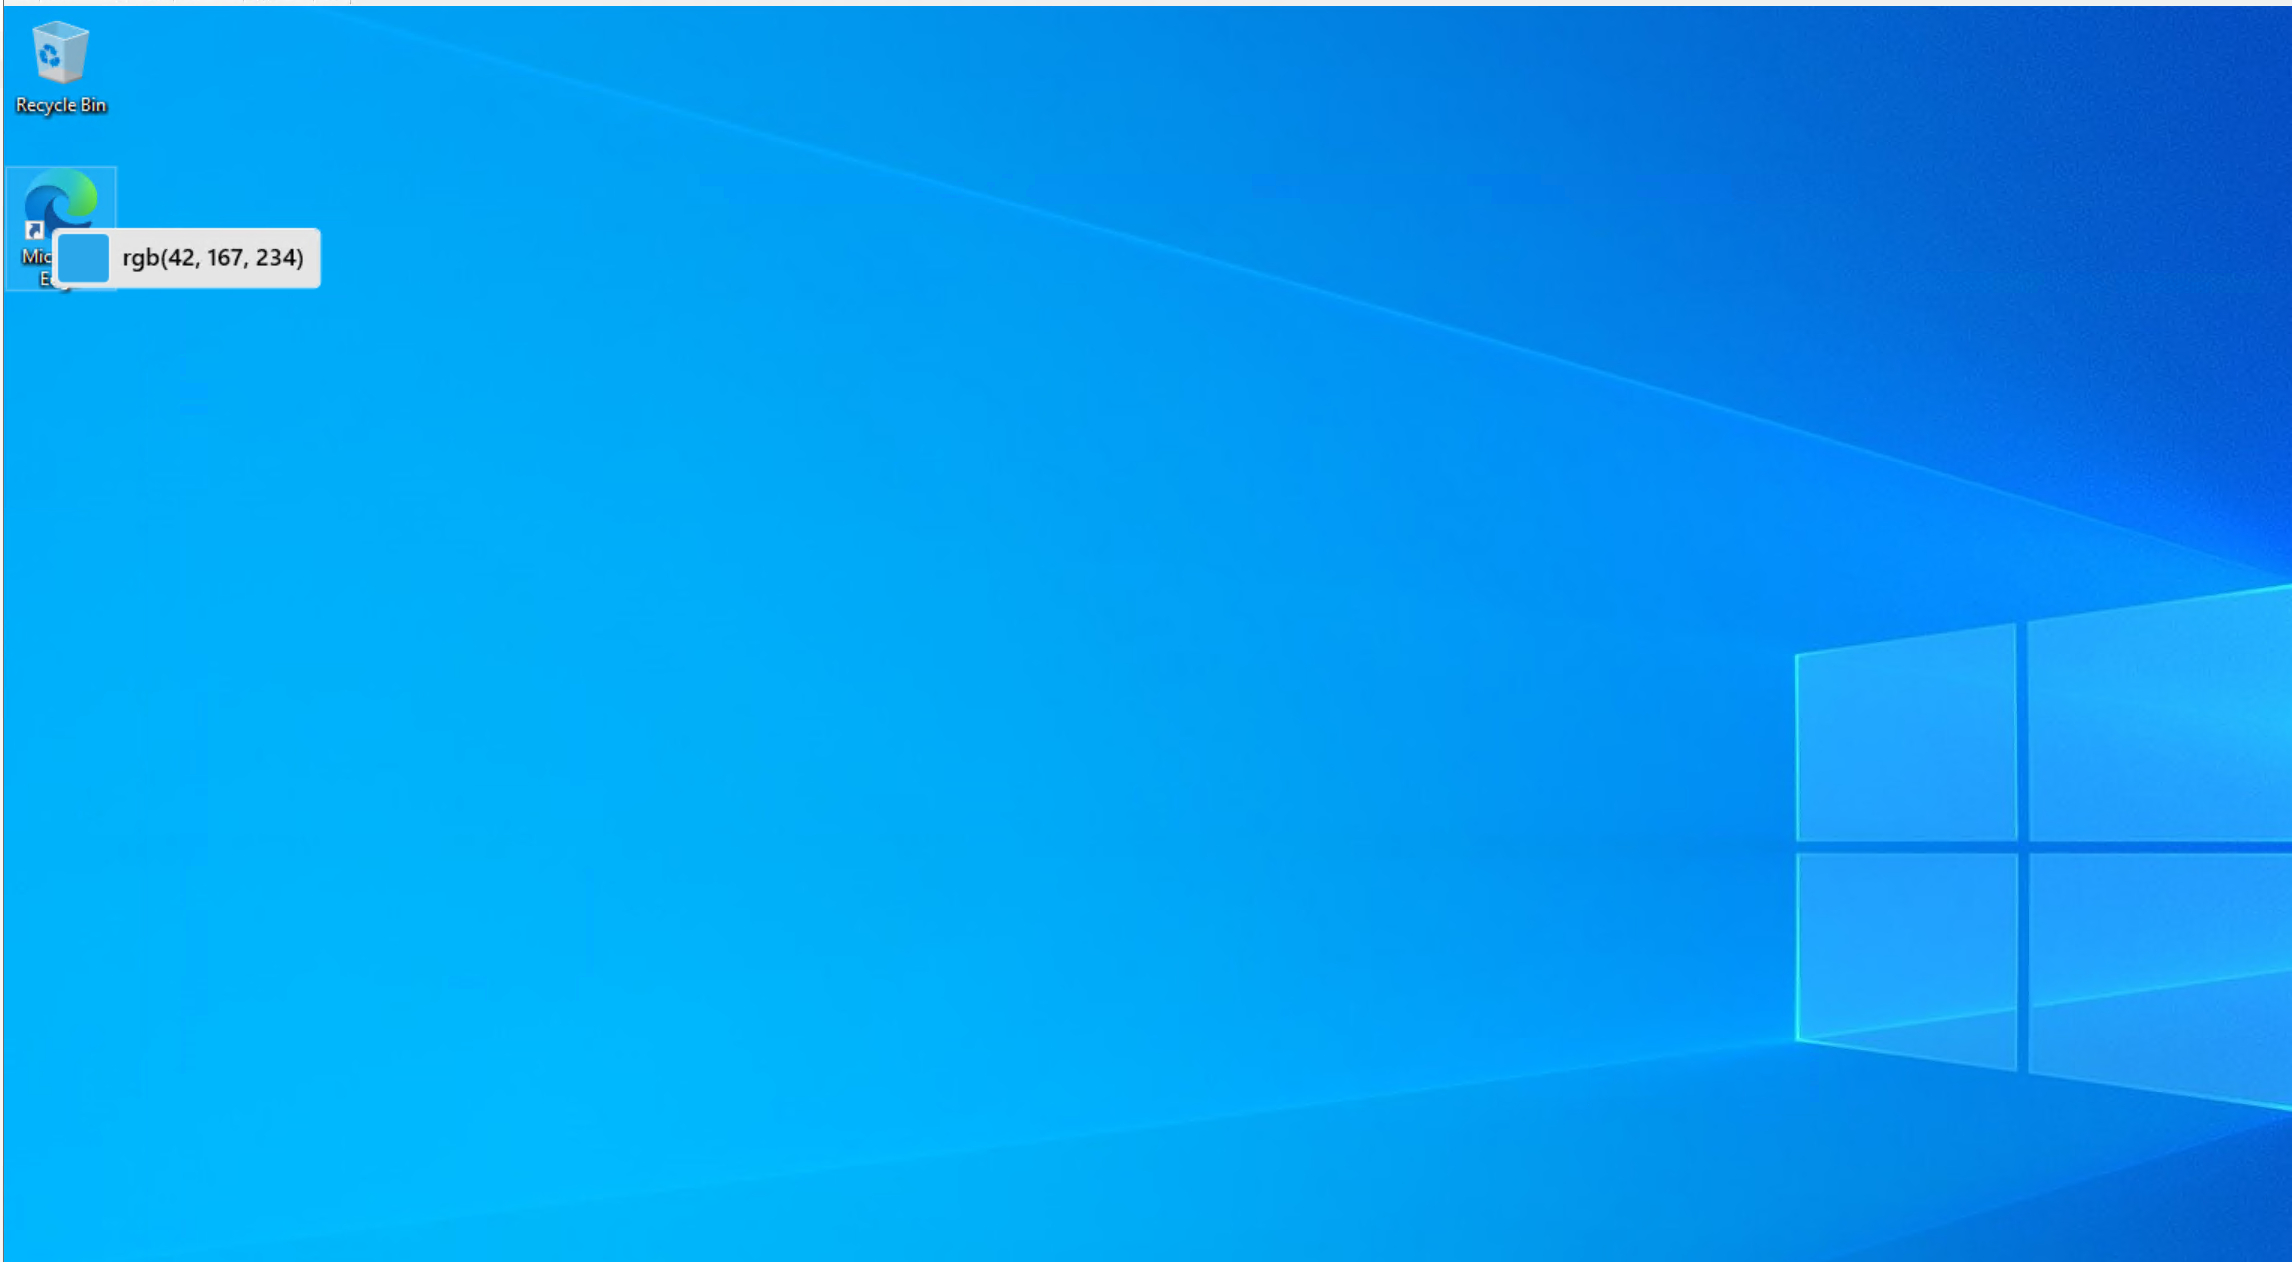
Color Picker identifies the color beneath your mouse pointer.
I find Color Picker to be handy for a couple of reasons. Firstly, as someone who does quite a bit of graphic arts work (mostly drawing), it can be tough to pinpoint the exact color I need. Color Picker simplifies the process.
Secondly, a couple of years ago, when I repainted my office, I explored countless design ideas online. When I came across photographs with color schemes I liked, I used a similar tool to extract the RGB codes for the paint colors used in the pictures. I could then take those RGB codes to the hardware store and get custom-blended paint that perfectly matched my specifications.
To launch the Color Picker, simply press the Windows key with Shift+C.
Command Not Found
Command Not Found is admittedly an odd name for a utility, but it aptly describes its purpose. This tool is designed to make it easier to use PowerShell. Although PowerShell natively includes thousands of cmdlets, not all cmdlets are readily available. For instance, cmdlets related to Hyper-V only become accessible after installing Hyper-V. When you try to use a PowerShell cmdlet not natively supported, the Command Not Found utility steps in to locate the module containing the cmdlet, as shown in Figure 3.
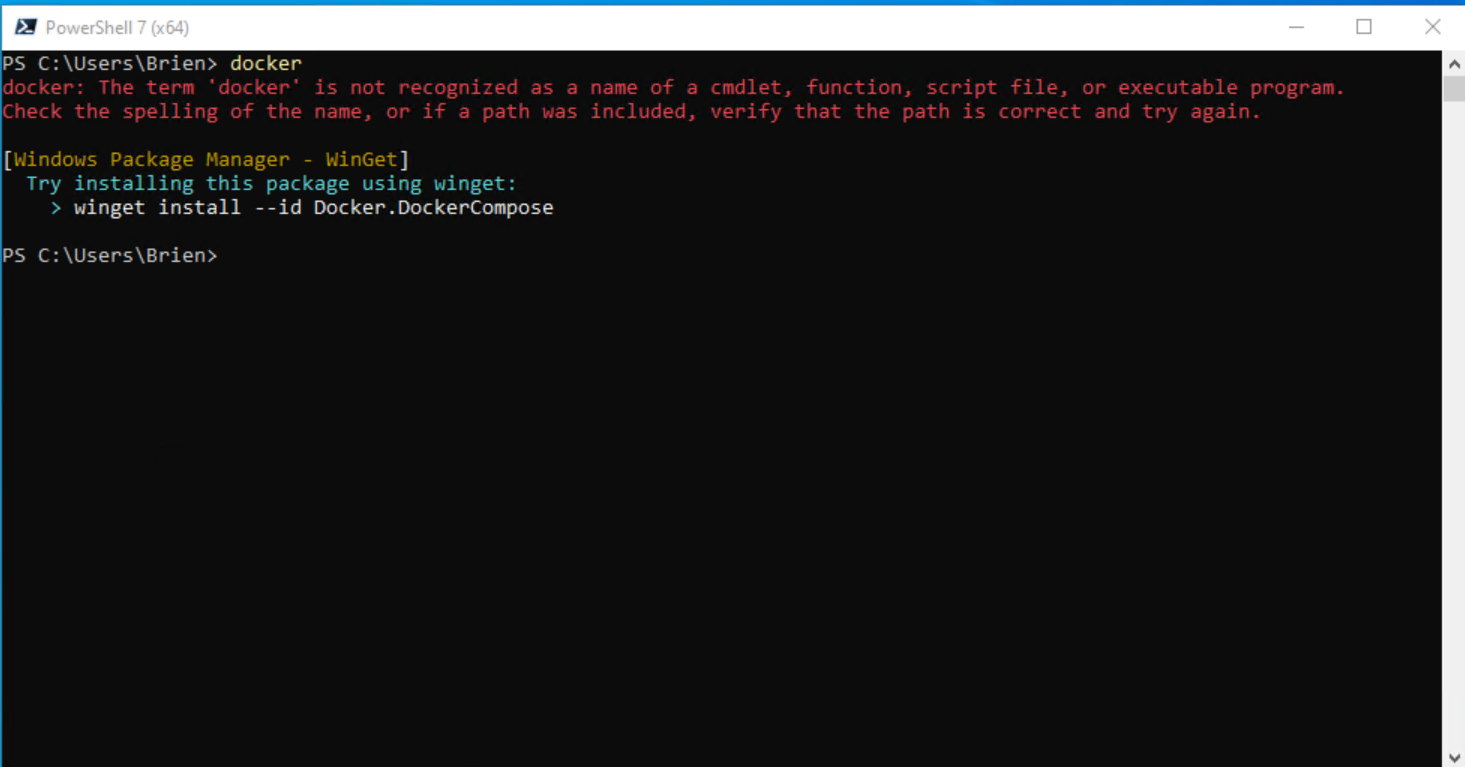
The Command Not Found tool helps identify the modules required for various PowerShell cmdlets.
There are two things worth noting about the Command Not Found tool. First, it only works with PowerShell 7.4 or newer. Second, you must install the WinGet Client before you can install this tool.
Crop and Lock
The Crop and Lock tool allows you to crop an active window and then lock that window in place. It is important to note that while this tool is useful, it’s not flawless.
There are two ways to use Crop and Lock. Pressing the Windows key with Ctrl+Shift+T creates a static version of the window. You can’t interact with the static window, except for basic functions like moving, resizing, or closing it. Alternatively, pressing the Windows key with Ctrl+Shift+R creates an interactive window, although stability issues may arise.
In Figure 4, you can see the PowerToys window on the screen. I used Crop and Lock to create a brand-new window containing a specific portion of the original window.
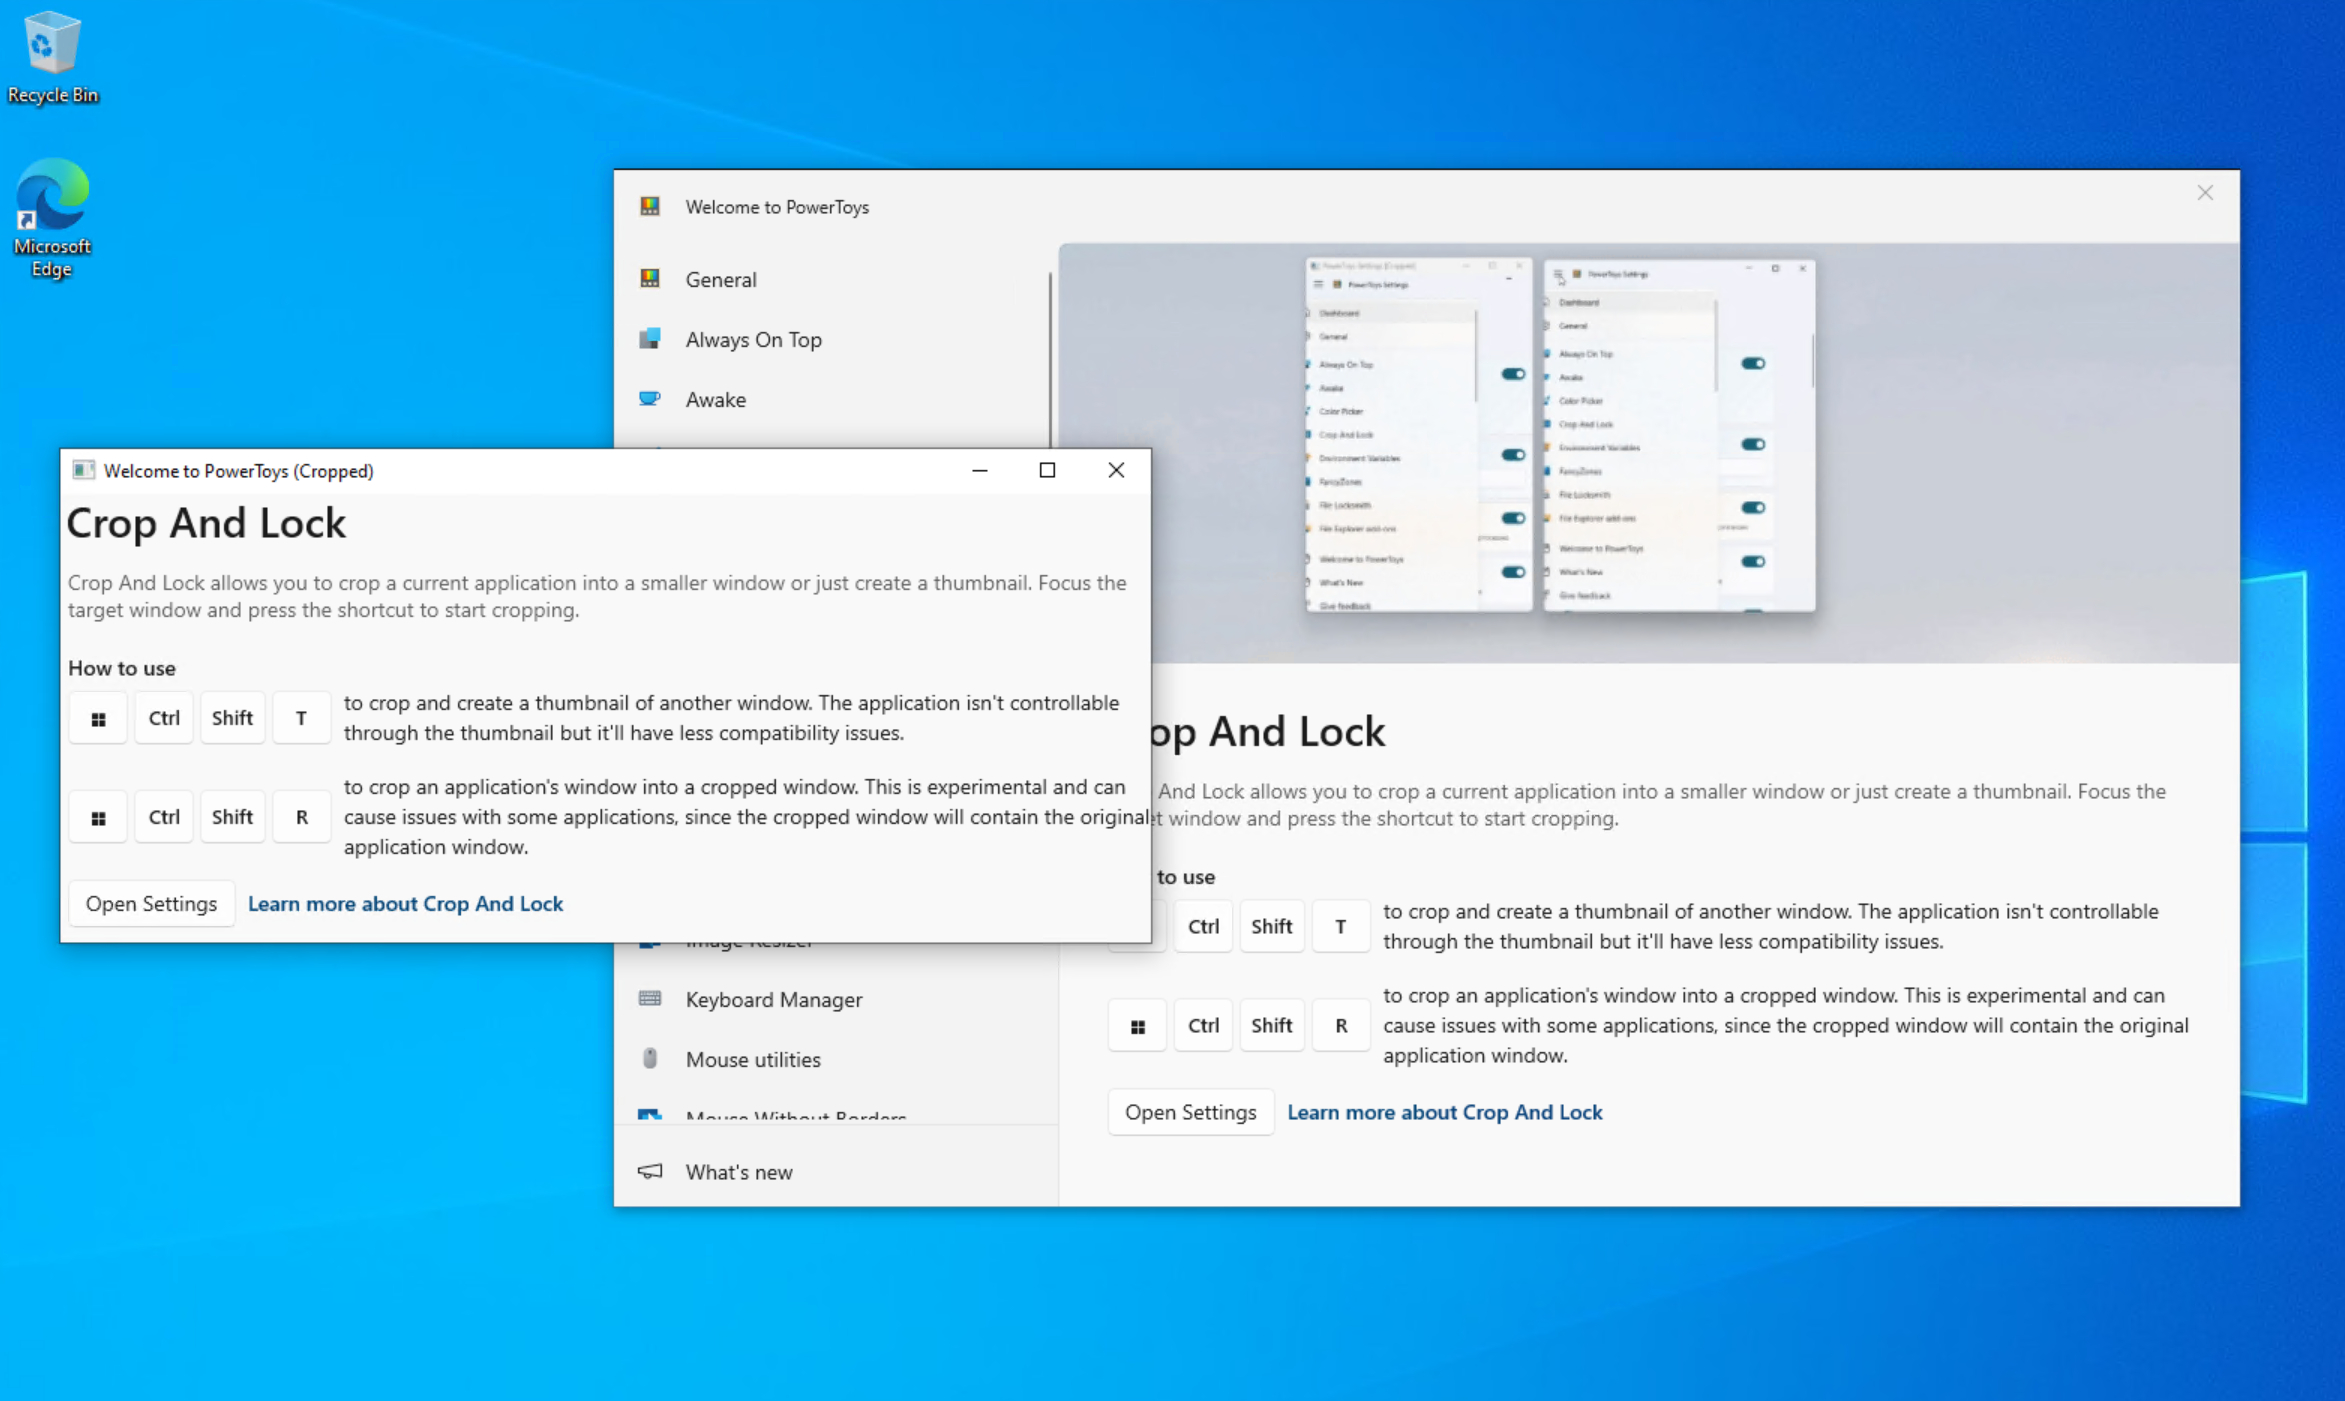
I created the foreground window by using Crop and Lock.
So, how might the Crop and Lock tool be useful? I can’t help but think of a situation last week. While troubleshooting a problem, I needed the Perfmon tool on screen. However, I was trying to minimize the amount of space that Perfmon occupied on the desktop so that I could interact with another window simultaneously. The Crop and Lock tool could have allowed me to retain only the portion of the Perfmon window that I needed.
File Explorer Add-Ons
The File Explorer Add-On tool enhances File Explorer by adding a preview window, thereby letting you view a file without having to open it or its corresponding application. While not all file types are supported, the tool provides previews for vector graphics, source code, PDF files, geometric code, and a few other formats. You can see what this looks like in Figure 5.
A preview window has been added to File Explorer.
To use the tool, just open File Explorer and select the Preview Pane option from the View menu. Windows will then attempt to generate a preview for any file that you select, assuming it is of a supported file type.
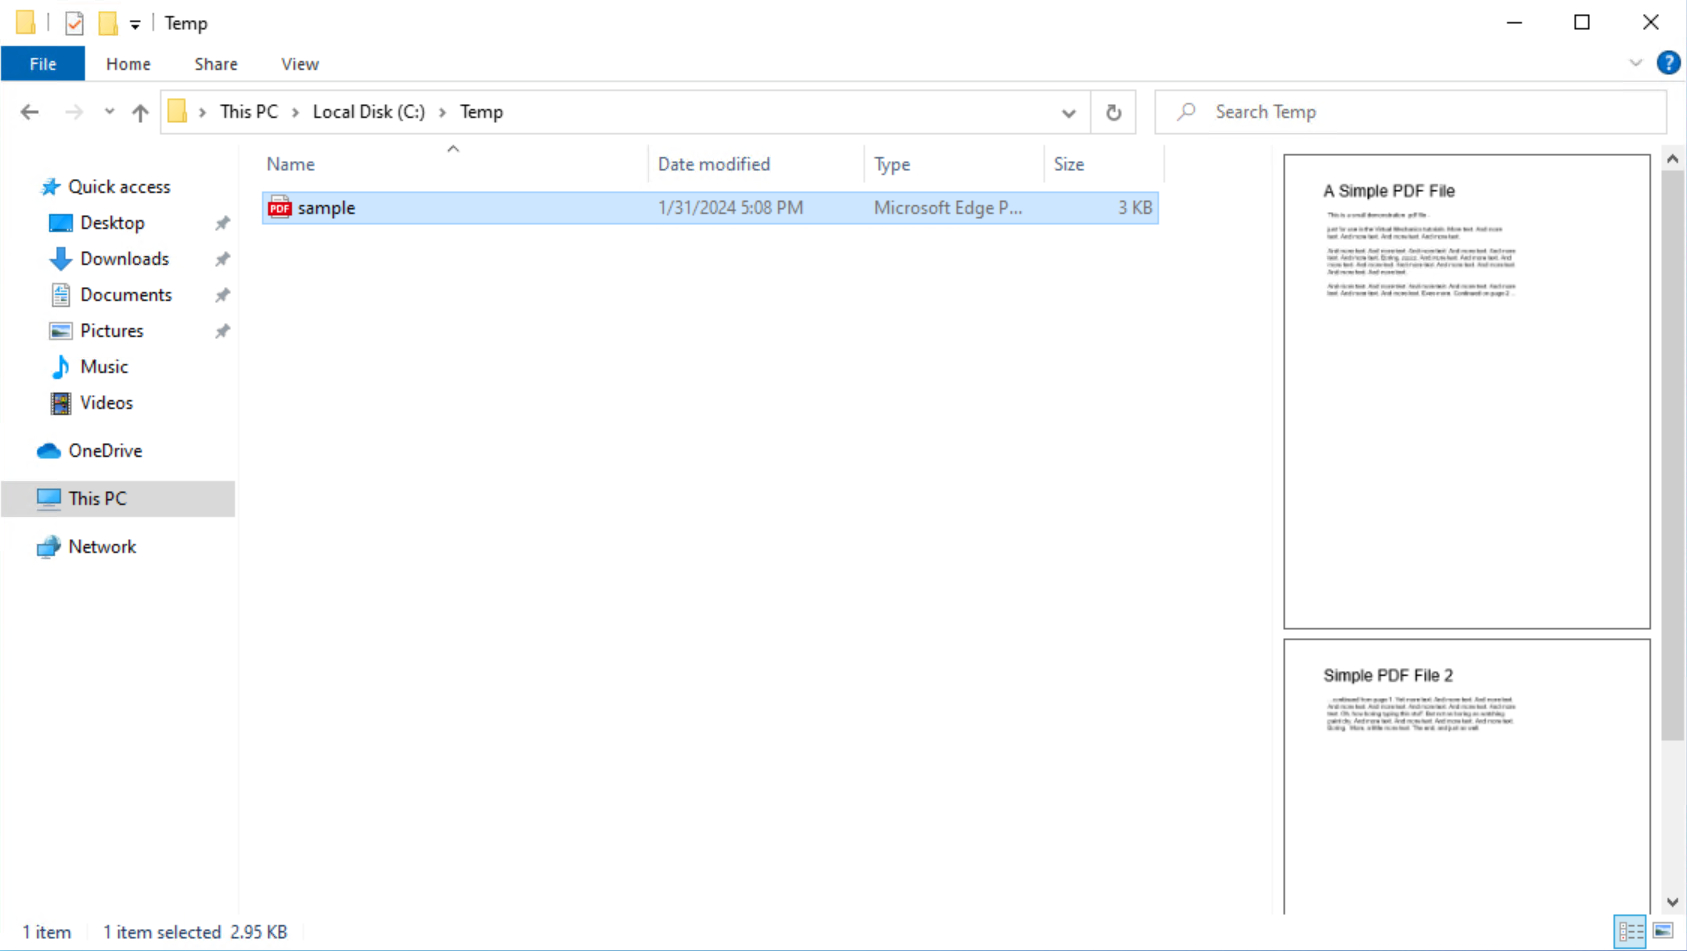
File Locksmith
From time to time, I have attempted to use a file only to discover that it is already in use by another process, and therefore locked. This is where File Locksmith comes into play. The tool can help you figure out why a file is locked.
Hold down the Shift key and right-click on a locked file to access File Locksmith.
To access File Locksmith, hold down the Shift key, then right-click on the locked file. This prompts Windows to display an extended version of the standard shortcut menu. As you can see in Figure 6, this menu contains an option to unlock the file using File Locksmith.
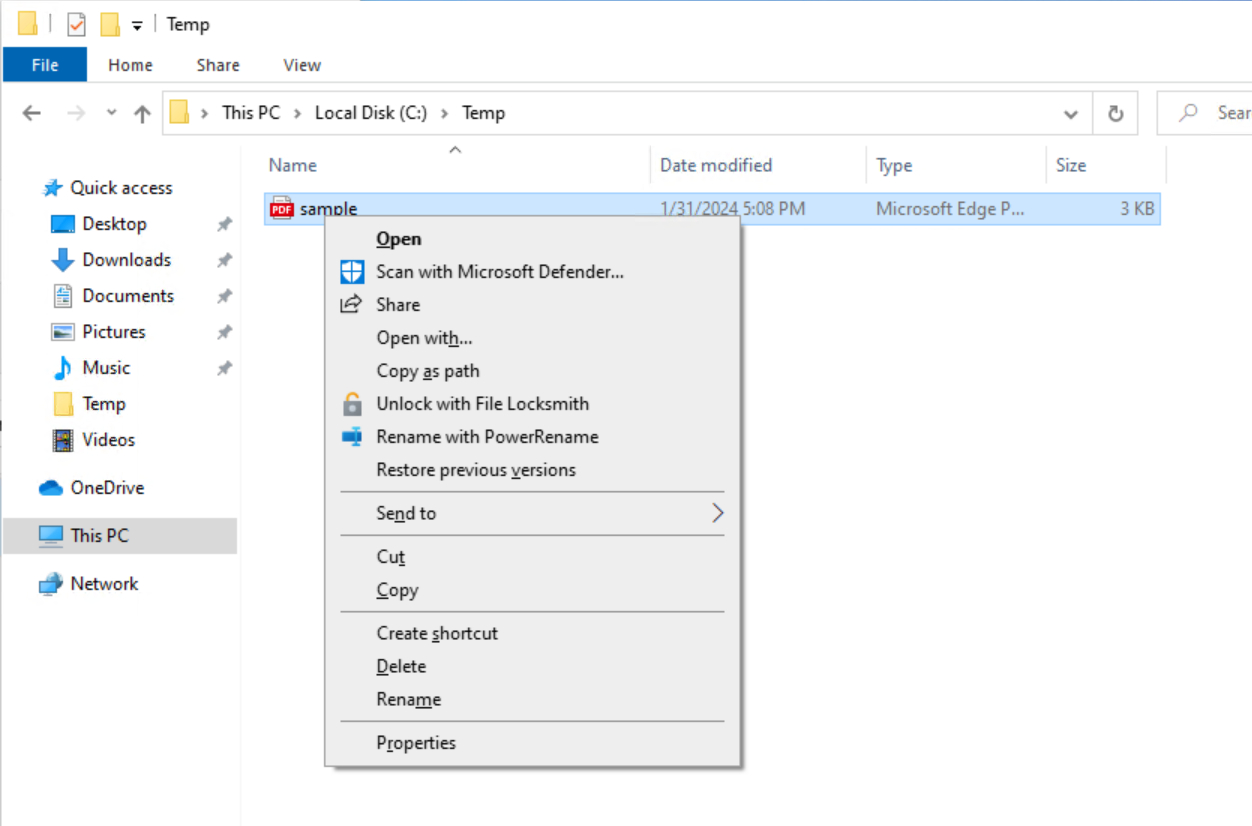
Hosts File Editor
I’ll admit, the Hosts File Editor probably isn’t a tool that most people are going to frequently use. Even so, I just had to mention this one.
A couple of weeks ago, during a server upgrade, I encountered a situation where two servers needed to communicate through a dedicated 10 Gbe link instead of the standard network connection. Because the 10 Gbe connection formed a direct link between the two machines, there were no DNS records telling the servers to use this link for communication. The way that I forced the servers to use the link was by modifying the hosts file.
The Hosts File Editor makes editing the hosts file easy.
Although there is nothing overly difficult about modifying the hosts file, it is buried deep within the Windows operating system. Its location is C:\Windows\System32\Drivers\Etc. The Hosts File Editor saves you the hassle of having to traverse the folder structure and gives you a nice GUI interface for making changes to the hosts file, as shown in Figure 7.
Mouse Utilities
Despite its simplicity, the Mouse Utilities is easily one of my favorite PowerToys.
The tool offers three different functions:
Mouse Jump: Mouse Jump speeds up the process of moving the mouse across large distances. Personally, I’m not a fan of Mouse Jump.
Crosshairs: Mouse Utilities can link crosshairs to your mouse pointer, as shown in Figure 8. (In this case, the mouse pointer itself is not visible because of the way that I had to create the screen capture, but the mouse pointer appears in the usual manner when using the utility.) I find the crosshairs useful when I need to make a precise selection for screen captures.
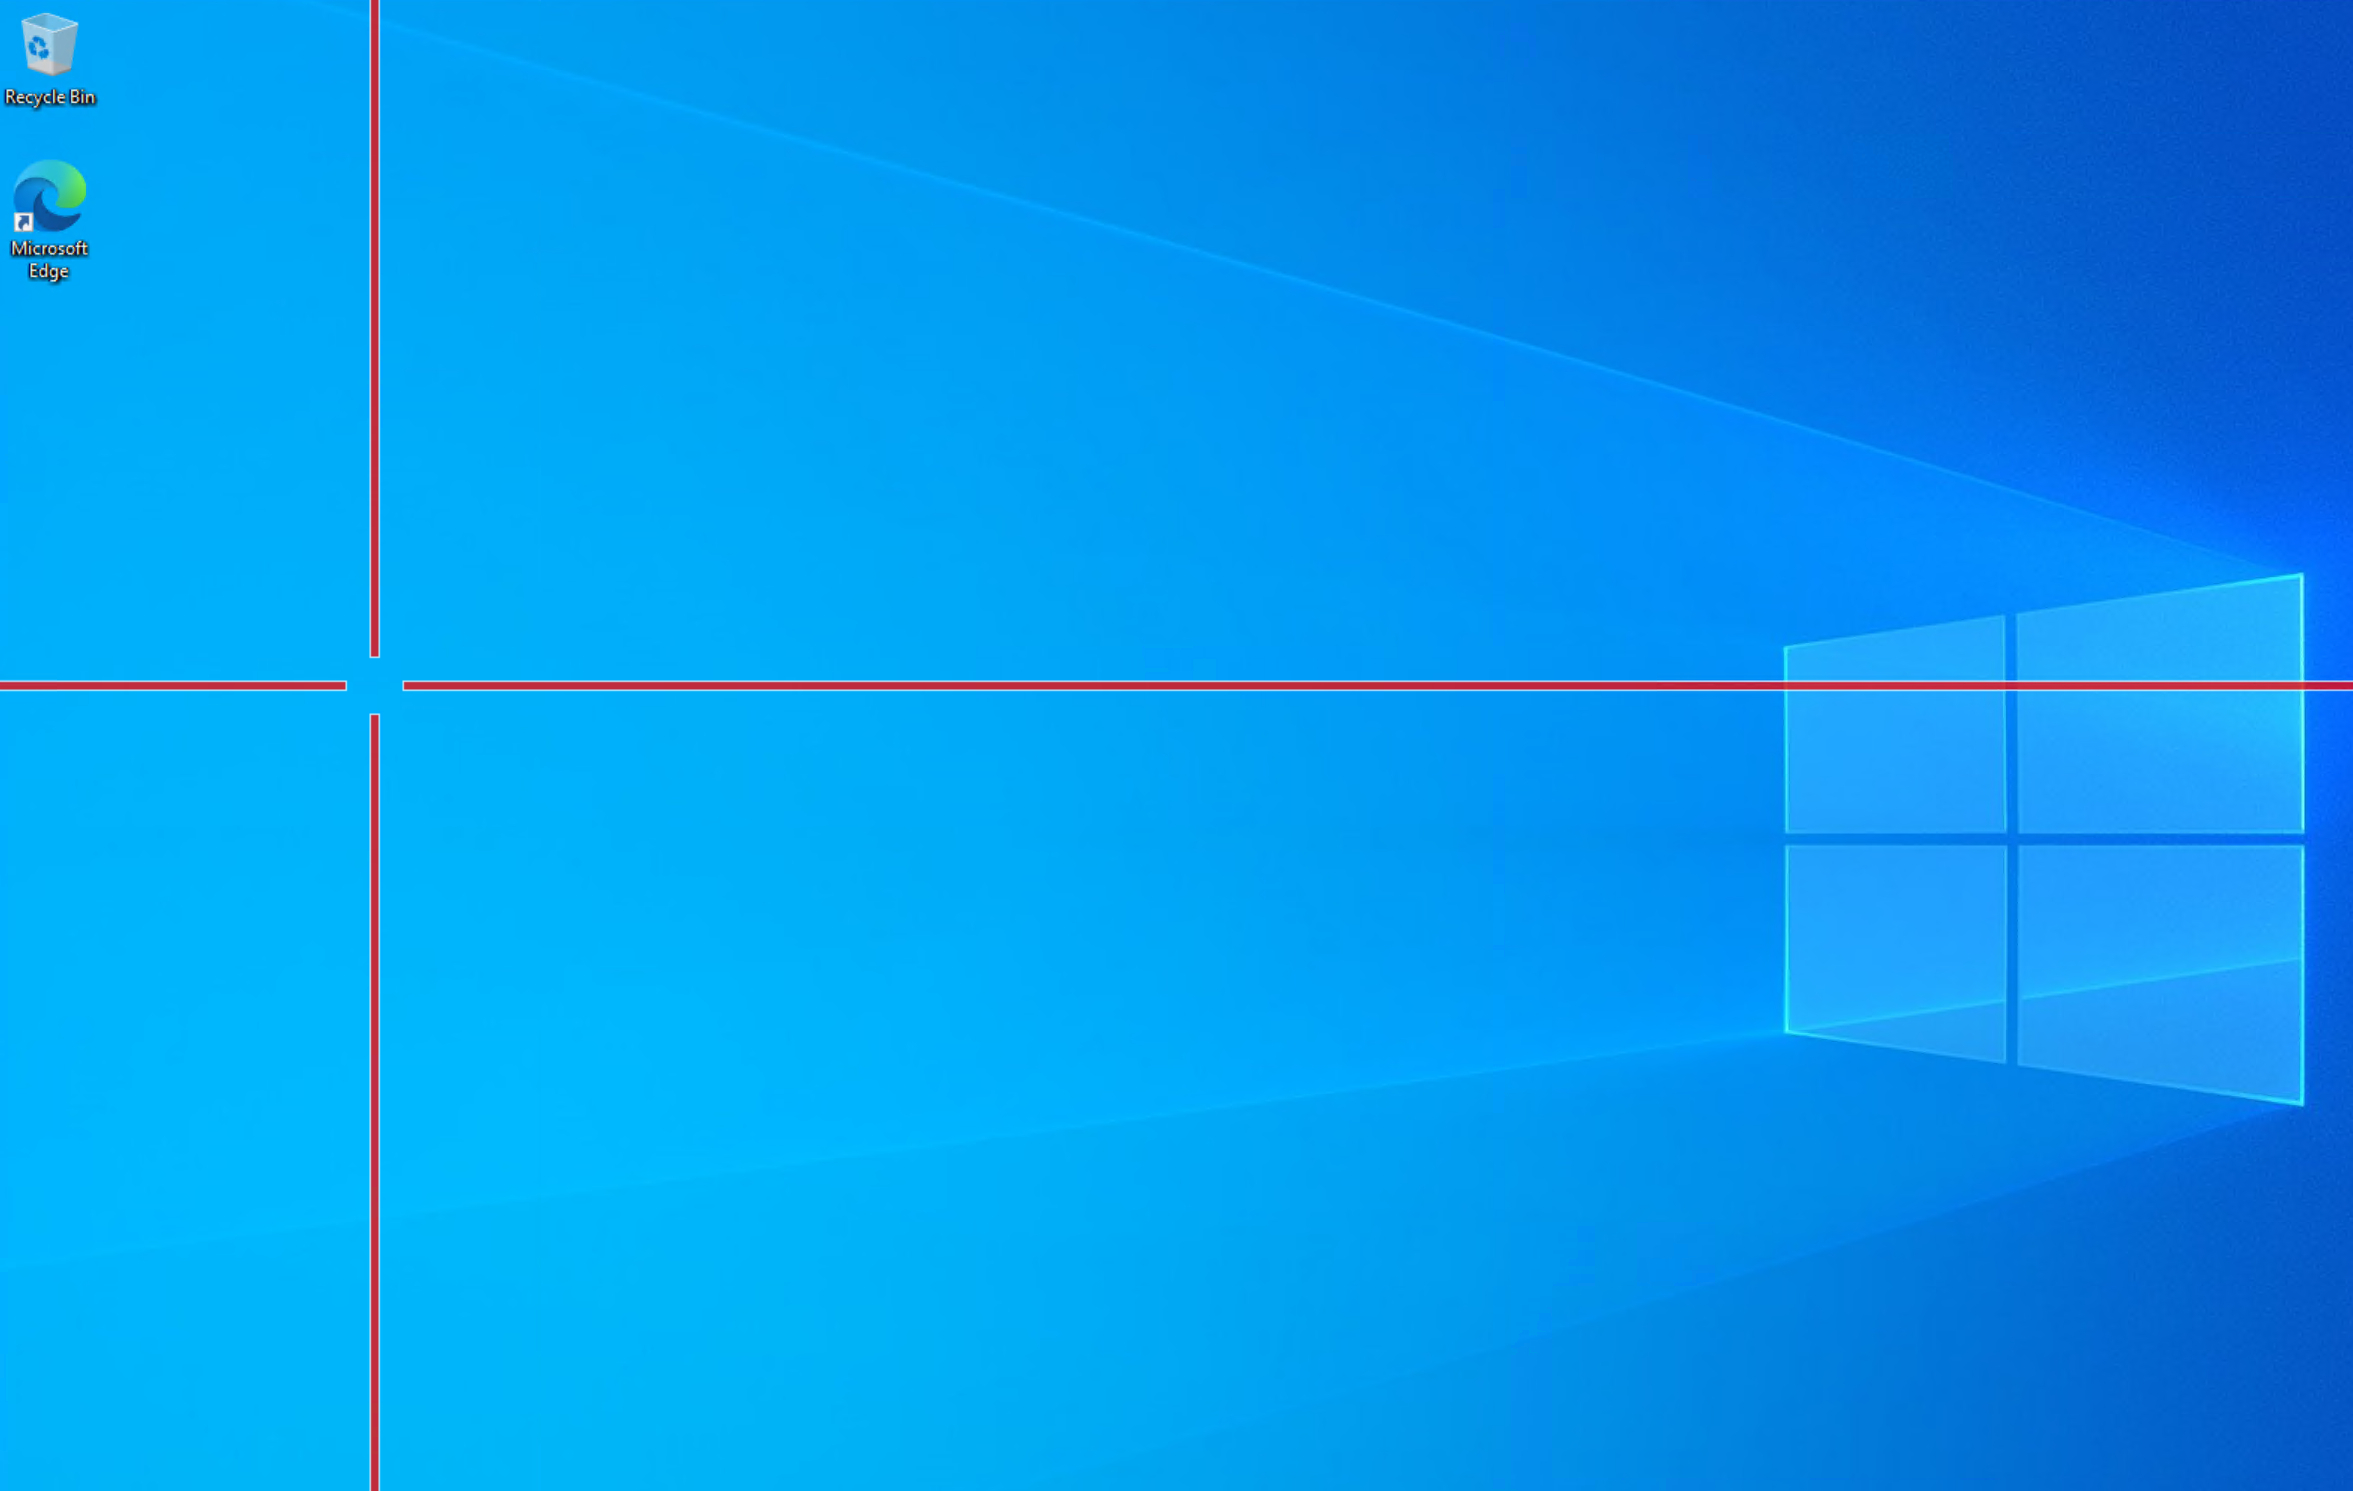
The Mouse Utilities can bind crosshairs to your mouse pointer.
Locate Pointer: Mouse Utilities can assist in locating your mouse pointer, which proves invaluable on a system with multiple screens. The PC that I use today has four screens, and I constantly lose my mouse pointer. I eventually configured Windows to use an oversized, bright green pointer, which helped, but I still occasionally lost the mouse pointer. With the Mouse Utilities, however, this is in non-issue. Just press the left Ctrl key twice to display your mouse pointer’s exact location.
Registry Preview
The Windows Registry Editor has long been able to import and export portions of the registry. Exporting registry keys results in the creation of a .REG file. Sometimes, when troubleshooting or working around issues, you may come across online fixes that involve installing one of these .REG files.
I have always been apprehensive about importing a registry file from the internet because you never really know for sure what changes the file will make to your registry. While it could potentially fix a problem, there’s an equal chance that it will cause harm. This is where the Registry Preview tool proves invaluable. It allows you to inspect the contents of a .REG file, providing a visual preview, as shown in Figure 9.
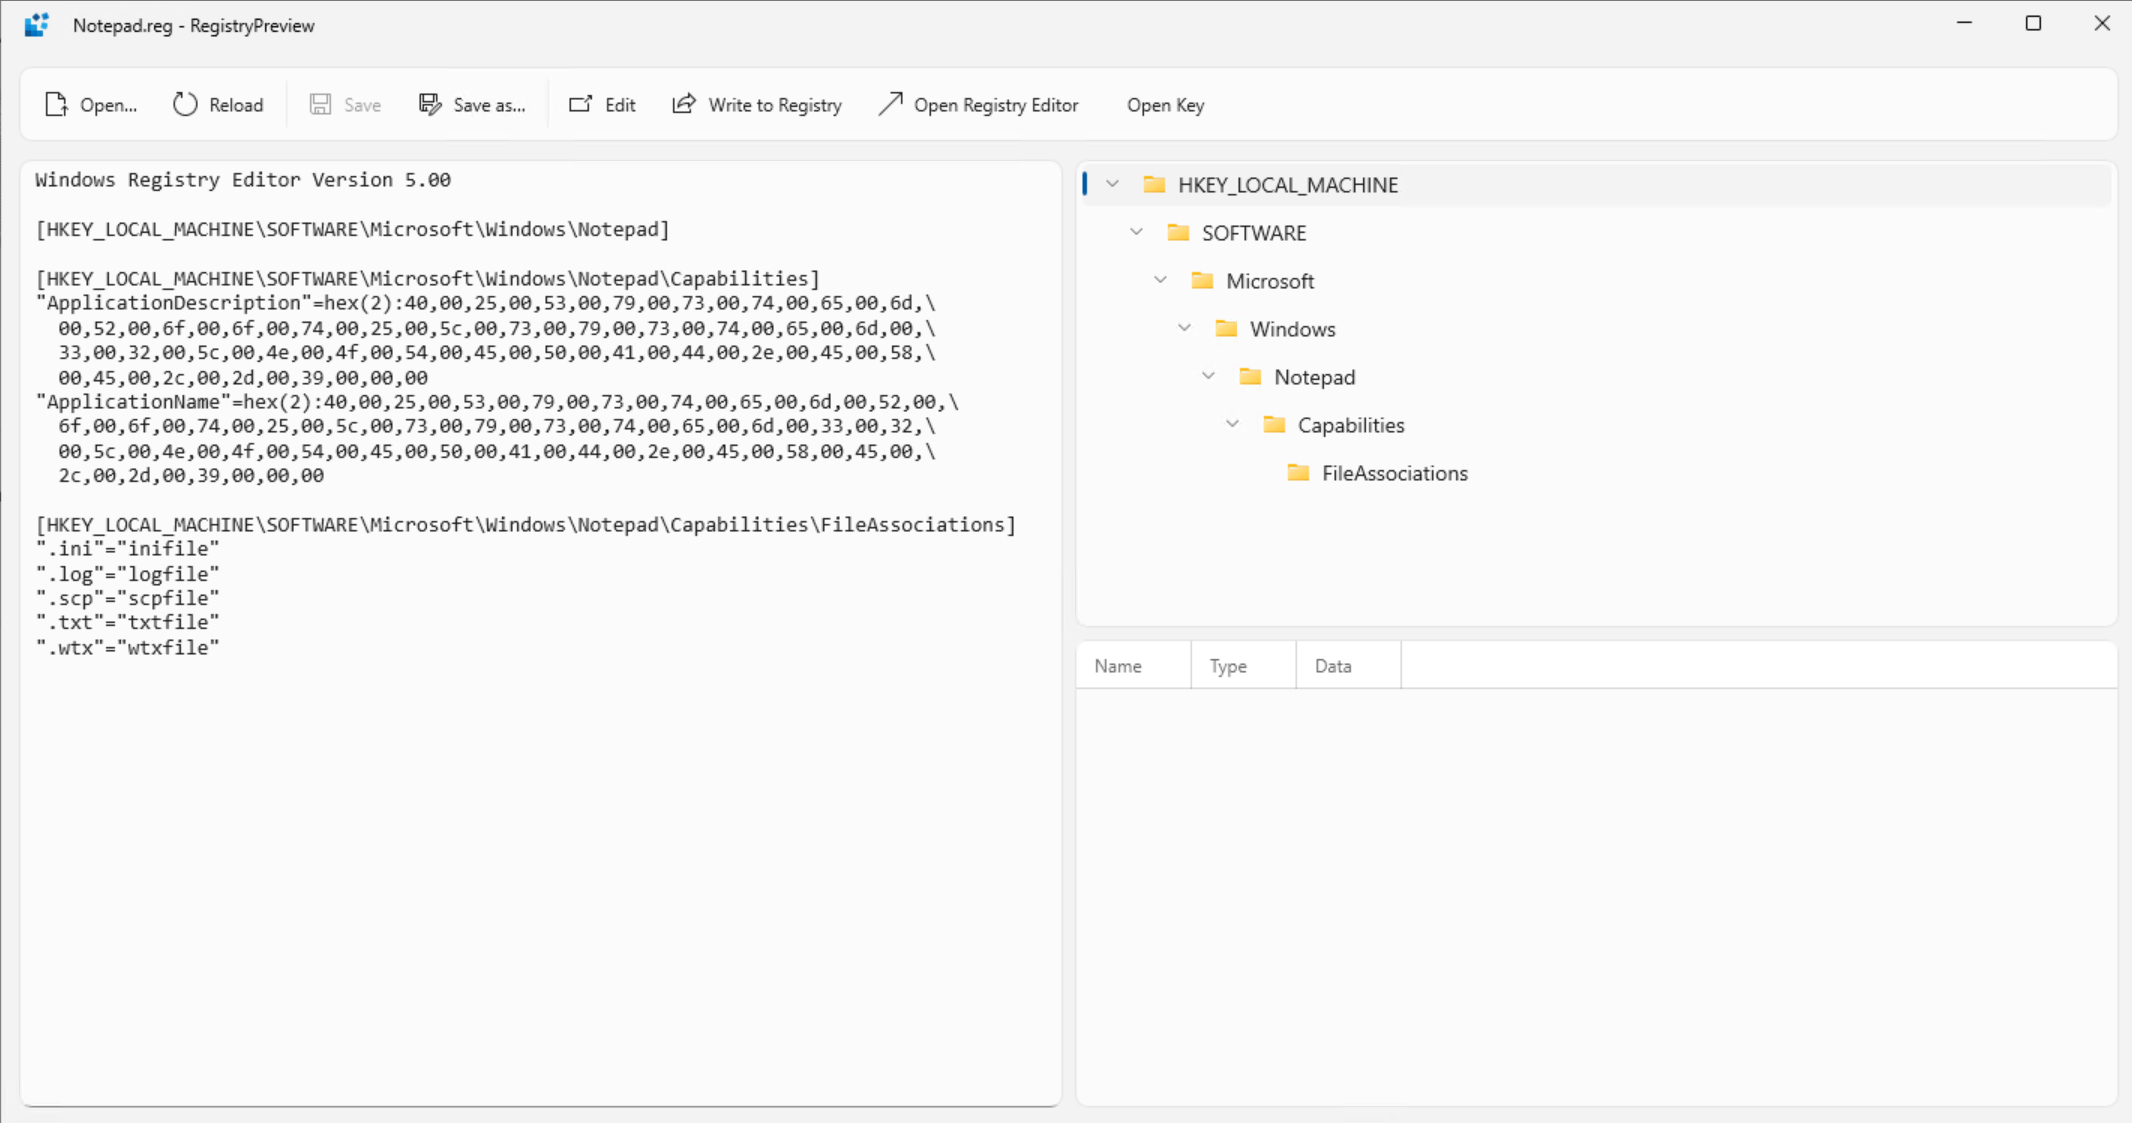
The Registry Preview tool shows you what’s in a .REG file.
About the author
 Brien Posey is a bestselling technology author, speaker, and 21x Microsoft MVP. In addition to his ongoing work in IT, Posey has trained as a commercial astronaut candidate in preparation to fly on a mission to study polar mesospheric clouds from space.


